Sunday, 6 July 2014

My first Mac purchase (and some other bits this month)

Hello again! 

I'm going to start today by talking about my first purchasing experience at Mac as I actually left the store with a product hurrah! I know there's lots of hype around Mac products and I always see them used in tutorials and blogs but I just don't enjoy visiting the store. I have been into the concession in Selfridges a few times and everytime I go it is heaving with people and the staff don't seem to have the time to look at you, let alone help you out with selecting products. Also, I find the layout very confusing and there are so many products, I could really do with some help when I go in there. Needless to say, I usually have a quick browse then leave empty handed. But this time I was on a mission! 
I have a serious blusher addiction and it's been a few weeks since the last purchase, so I decided to visit the Mac stand alone store in Birmingham to get a new pinky blusher. It's a small store but yet again there didn't seem to be enough staff for the people milling around. It was daunting, but I had to go it alone. I managed to find the blushers after a bit of searching and shortlisted a selection of 3 pinky tones. Luckily I had the lovely hubby with me who pointed out that one of the blushers had a shimmer (not what I was after as I like to use a highlighter instead). I finally decided on the Satin Powder Blush in Fleur Power. The colour is pinky but isn't too bright, it almost looks as though it has some orange undertones to give a natural flush. 
I did have to stand in a queue for a while but when I finally got to the counter to ask for my product, the sales assistant was very friendly. She also offered me a primer sample which I jumped at! I got a little pot of the Prep and Prime skin base for combination skin (you are given a choice depending on your skin type which I thought was a nice touch).
I used the primer and blusher for the first time last night and my thoughts so far are good. The primer made my skin feel like velvet, it really smoothed and perfected my skin ready for my foundation and worked well with my Origins moisturiser too. I'm also happy with my choice of blusher. It is quite pigmented so I didn't need too much, but it glided across my cheeks evenly and worked well with my Real Techniques Blush brush. It'll be my go to blusher when my lips are quite natural and I'm focusing on my eyes.
So overall my Mac experience was ok, I think because I knew exactly what I wanted I could go it alone but if I'd have needed help I think I would have left empty handed again. Mac need more staff! Here's the blusher and primer at work.


Another purchase that I made recently and briefly mentioned in a previous post is the Origins Checks and Balances Frothy face wash. 
I love my La Roche Posay cleanser but I fancied trying something different. I decided on Origins after recently purchasing (and loving) the GinZing moisturiser, I thought that it was time that I tried some of their other offerings. I had a great experience at the concession in House of Fraser. I told the sales assistant what I was looking for and how much I wanted to spend and she pointed me in the direction of 2 cleansers. The other cleanser was a GinZing product with exfoliating beads. She tried both products on my hands and I decided, as I still have my Clarins exfoliator, to go for the creamy cleanser. I've been using this cleanser for about 3 weeks and I really like it. It does exactly what it says on the tube, you only need a small amount of product as it is quite rich and when lathered on your face it creates a really creamy froth. It leaves my skin feeling soft and clean and it isn't too harsh, so my skin doesn't feel as tight as it can do with other products. My only gripe is that when I tone afterwards I do sometimes get a small amount of dirt coming off on the cotton pad. It is only a tiny bit but I never had that with my La Roche Posay cleanser. Maybe because it isn't as harsh it doesn't leave my skin quite as squeaky clean. Overall though I do think that this is a good product and I think it has contributed to my skin looking quite clear and soft at the moment (even if I do say so myself!) Oh and it was only £18 which I thought was quite reasonable. 

My final recent purchase is the Sensationail Fuse gel varnish in the colour intens-so-fly (is it me or is that a really random name?) 
I've seen a lot of minty greens around and I think it's a really fresh colour for summer. I also have short nails and ,this might just be me, but I think these quirky colours really suit shorter nails. I will definitely be wearing this colour on my holidays this summer. 

Finally I did say that I would tell you my thoughts on my Origins face mask freebies that I received with my purchase of the GinZing moisturiser a couple of months ago. 

I've used 2 of the pods and I think they're really good. They tighten up nicely on the skin and require a lot effort to remove with a warm flannel but they have left my skin feeling brightened and I've had no unwanted breakouts after using them. It also did a really good job of removing bits of dead skin that tend to hang around my nose (lovely) So another fabulous Origins product! 

I hope this post has been helpful. I'm still thinking of setting up my own YouTube channel too. It would be great to hear if this is something that you'd like to see.
Thanks for reading. 
Becky xx

Saturday, 28 June 2014

Daytime Make-up Routine


Hello! It seems like ages since I wrote my last post so to make up for it I'm writing a super long one today. It's been lovely to hear from people who are enjoying my blog and I've had a few requests to do a post on how I apply my make up. I am in no way an expert but I do really enjoy putting my make up on and using tips that I've seen on other blogs so I thought I would share how I do things. 

Oh and bit of a disclaimer- there are some truly hideous make up free/semi made up pictures of me I am sorry but I thought this needed pictures to stress the point a bit. So here we go... 

Step 1: Here is my totally naked face. I had a wash with Origins checks and balances foaming face wash (a new purchase-totally loving it-it's like washing in shaving foam!) toned with La Roche Posay Effaclar toner and moisturised with Origins GinZing.
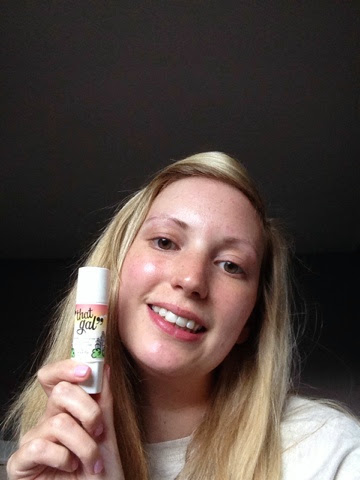
Step 2: The first thing I do make up wise is apply a primer. I do this most days because I like the way it smooths out and brightens my skin and helps my make up to last. Today I used the Benefit That Gal brightening face primer.
Step 3: I then apply my foundation. Today I have used my Dior Airflash foundation in 202 with the Dior 12 foundation brush. To apply I spray the brush with foundation, work it over my cheek, then spray and do the other cheek, then a spray for the nose and chin and a final spray for my forehead. I spend quite a long time buffing the foundation into my skin as I like it to look quite natural.
Step 4: Concealer time. I've dotted No7 Instant Radiance concealer in 2 under my  eyes and No7 Stay Perfect blemish cover in Medium over spots and imperfections (I've got quite a few of those!) I then blended these into my skin with a No7 concealer brush which I think works better than using your fingers as you're not adding grease to your face or wiping away the make up. 
Step 5: Eyebrows. The photo is a bit scary for this but it all works out in the end! I used the Sleek Brow kit in 818. Firstly I use the rounded brush to apply the wax - you don't need much of this just a light covering to tame the brows. Then, I use the angled brush with a very light covering of setting powder. I colour in my brows as mine are very patchy and are totally different shapes so it helps to match them up try and make them look related. Kind of. 
Step 6: I'm using my Sleek eyeshadow pallette today so have decided to use my No7 eyeshadow primer first to keep my eye make up in place (I don't need to use a primer with my Dior compact, might be a quality thing?) I just shove my finger in the pot and rub it all over my eyelids not going above the crease. 
Step 7: I like to use a highlighter on my brow bone. Today I've applied a small amount of No7 Instant Radiance highlighter and smoothed it over with my fingers just to give a subtle sheen.
Step 8: Next is eyeshadow. I used my Front Cover fluff and buff brush to apply Sleek's Calm before the storm all over my eyelid. 
Step 9: I then layered Sleek's Thunder Storm (which is a goldy shade) over the top and applied Dust storm (a dark brown) to the outer edge of my eye blending into the crease and also underneath my bottom lashes, from the outer corner to just before the middle of the eye and Thunder Storm from the inner corner to the meet Dust Storm. (Ramble, sorry).
Step 10: I ALWAYS wear eyeliner but for some reason I didn't put it on today... So I went straight to ny Front Cover eyelash curlers to give my lashes a bit of a boost. 
Step 11: Mascara. Today I went for No 7 Exceptional Definition mascara in black. I've had this mascara for a few weeks now and it's starting to thicken a little which I love! It volumises and lengthens my lashes even more than it did originally. Brilliant stuff! 
Step 12: To avoid a big, shiny face I used a little bit of the Clinique Gentle Light powder in 3 over my forehead, nose and chin with a fluffy 17 powder brush.
Step 13: I've started to enjoy contouring my cheeks a little. So I used the bronzer from the Sleek contouring and blush pallette with my new Real Techniques Blush Brush (less than a tenner from Asda and I love it!) I suck my cheeks in and apply the bronzer in the hollows and extend it to my temples and apply a little under my chin(s).
Step 14: After bronzing I used the No7 Mineral Perfection blusher in Soft Damson on the apples of my cheeks with  the same brush. I find smiling helps the apples to stick out a bit so you don't go overboard on the blusher. 
Step 15: It's all about the highlighter on the cheekbones now. I used the Sleek highlighter from the contouring pallette with my Real techniques brush just on the cheekbones extending up the temples. 
Step 16: My final step is my lips. Today I used Tanya Burr's lipgloss in Picnic in the Park. It's a new gloss and I love the colour. It is a very natural peachy pink but unlike a lot of glosses it is quite pigmented so you can actually see the colour. The Brucie Bonus was that it was only £6.99 from Superdrug and it smells lovely. 
And that is it! I unclipped and straightened my fringe for the final photo and here it is...

Thank you for persevering through some truly hideous pictures. This make up routine is a day time routine for me, maybe a little more than I'd wear for work but for a trip to the shops or a day out somewhere (we are really into our National Trust trips at the moment- old I know!) it's a perfect look for me. I hope that I was of some help and please let me know if you have any tips/product recommendations etc.  
Becky xx

Sunday, 15 June 2014

Why I love shellac/gel nails

I've been meaning to write this post for ages as I'm a total gel nail colour addict. Those of you that know me will know that I am very rarely without colour on my nails and I'm not happy unless they are bright and beautiful!

I first tried shellac a couple of years ago. I heard that it had really good staying power and as I was going on holiday, I thought it would be a good opportunity to try it out. I went to the salon and paid about £15 to have my finger nails painted in a nice bright pink colour. It all took less than an hour and I was impressed because the colour lasted a whole week  of sun, sea and swimming pool action. After that I became a bit of a regular at the salon, paying £15 every few weeks to have my nails done. 

That was until I saw an amazing offer in my favourite shop Boots (is there a post I've written that doesn't have Boots in it?!) they had the Sensationail gel starter kit with a colour and UV lamp on offer for about £50. I thought this was totally bargainous so picked one up and haven't used a normal nail varnish since. You need to set aside about 1hr if you want to do your nails properly but it is so worth it as, if you paint your nails following the instructions, they won't chip and can last for 2 weeks (mine have even lasted for longer than this!) 

The Sensationail colours are about £15 per pot but they will last ages and none have them have clumped like nail varnishes can. I have bought most of my colours from Boots but you can also get cheaper versions from the internet. I have recently tried two of the Bluesky colours which worked out at about £5 each. They're ok but the quality isn't the same as the Sensationail polishes. Excuse the terrible photo but this is my nail kit below. 


My main reason for loving the gel polish so much is that they last, I only need to paint my nails every couple of weeks. Also, with gel there is no waiting around for your nails to dry. You just pop them under the uv lamp to harden for up to 60 seconds at a time and they're done! Because you don't have to wait for your nails to dry, there is also no risk of smudging - there is nothing more frustrating than spending ages on your nails for them to smudge or chip 5 minutes later, argh! My nails also grow very quickly underneath the gel. 

The only problem that I have really noticed is that, if you are a bit naughty like me and don't remove the colour properly by soaking them in nail varnish remover (I pick mine off). You can peel off some of your nail, making them weaker than normal. I don't think that this would be a problem if you followed the instructions though. Oops!

So that is a little review on gel nail varnishes. I know there's lots of kits out there but I would recommend the Sensationail kit for quality and price. Also, if you've never had them done, try it at a salon first to see what you think. 
This is the colour that I will be wearing for the next couple of weeks which is Kitten Heel. 


I hope this post was useful. Thanks for reading!
Becky xx

1st time self tanner. Eek!

Hello!

My first post today is all about the wonderful world of self tanning. Now I have had a spray tan before and I have used the moisturisers with the gradual tan, but I have never been brave enough to try actual, one application fake tan. But, we were out on Saturday night and I had purchased a new dress for the occasion that had a base colour of white, argh! Not a good look with my pasty, knobbly knees! I couldn't be bothered with the faff of a spray tan and as much as I like the gradual tanners, they always leave me smelling of biscuits (does anyone else thinks that fake tan smells like that?) and they also leave my skin quite sticky.

So, I took a trip to trusty old Boots to see if they could sort me out with a fake tan that wouldn't make me a streaky, orange mess!  I spent a very long time perusing the aisle trying to work out if I could justify the price of the St Tropez express tan, £25 seriously?!! But as I don't often wear tan I couldn't. Instead I picked up the Soltan Beautiful Bronze self-tan gel which claims to give you instantly luminous skin that develops into a natural looking colour in 2-3 hours. 


I felt that this was the perfect option for me as I wanted something that I could apply on the day of the party rather than the night before. There weren't a huge amount of instructions on the tan which stressed me out a little but I prepared my skin as you would for a spray tan- with a shower and a good old exfoliant (I used my Clarins exfoliating body scrub on dry skin which worked wonders! Amazing stuff!) 


I then used a tanning mitt to apply the gel all over (had to get Tom to do my back!) now I'm not sure that my skin became instantly luminous, it did have a subtle glow but I still felt a bit pasty. I began to notice the tan developing after an hour or so but I think it took longer than the 3 hours to develop into the tan that it claims. 

Here is a picture of me at the party. I'm quite pleased with the tan here as I think I  have a nice glow without looking too obviously tanned (this is about 3 hours after application).
I have woken up this morning with a slightly deeper tan and I'm really pleasd with it. I don't smell of biscuits, my skin didn't feel sticky at any point and I could put my dress on as soon as the tan had dried. I would recommend this product to  first time tan users and anyone that wants a tan that doesn't involve too much stress. Plus, at £8.99 I don't really think you can go wrong. All I would say is if you want the full effect of this product, apply it at least 5 hours before. 

Thanks for reading 
Becky xx

Sunday, 8 June 2014

My No7 Collection

I've been meaning to post about No7 for a while as although I have developed a love for Dior and Nars, I also have a LOT of No7 make up and I really rate it! I like No7 because it doesn't cost the earth and I do feel like I'm purchasing good quality make up. Also, those lovely little £3 off vouchers are an added bonus. So I thought I'd write a post about my favourite No7 bits.

Number 1: 
I love the Instant Radiance Highlighter. As a fan of Benefit Highbeam I wasn't sure if I'd like the cheaper alternative but this is a great product! It comes in stick form so you can just sweep it across your brow and cheek bones and it creates a really subtle shimmer. Because it's in stick form it also doesn't get messy like the High Beam does (mine has gone all goopy around the lid). A definite favourite in my make up bag.

Number 2:
Perfect Light Pressed Powder in Translucent. I use this powder everyday to help keep my make up in place and I think it's great. It does come with a spongy applicator but I think it can look a little chalky if you apply the powder with it. Instead I use a really chunky powder brush which distributes the powder much more evenly and I think it does a really good job of keeping my foundation in place. I also much prefer the pressed powder to the loose options ( I did have the Clinique gentle light powder) I find loose powders get in such a mess and end up peppering the rest of my make up , very annoying! 

Number 3: 
Firstly, apologies for the state of the packaging but that's a testament to how long this product lasts! It's the Instant Radiance concealer. I have used this under my eyes pretty much everyday since my wedding in August last year and I think it is an amazing dupe for YSL touche éclat. It has light reflecting particles in it and I think it really helps to brighten the dark circles that I regularly have under my eyes! I dab it on and work it in with my No7 foundation brush which works really well for me. Another great No7 product. 

Number 4: 
The photo doesn't do this justice but this product is a fairly new purchase and I really like it. It's the Mineral Perfection blusher in Soft Damson which, as you can see, is a pinky colour. It does look quite scary in the container, but when applied with a good blusher brush, it creates a really nice flush on the cheeks. I wouldn't recommend using the brush it comes with as mine malted all over my face but you don't buy the product for the brush! The blusher is super pigmented and you can build up the colour for the desired effect. I also think that this will last me ages as you don't need much of it.

Number 5:
All I can say is wow! This is a tester of the Exceptional Definition mascara but I loved it so much I bought some today. I honestly think that this is the best mascara I've ever used. It does have a plastic applicator (I think I'm the only person in the world that prefers them!) but it grips really well onto my lashes and adds extra length. I can't wait to try the full sized product! I got it with my £3 off voucher today and because I'm in the Boots contact lens scheme I also got an extra 10% off the price! It was somewhere around the £8 mark in the end, bargain! 

Number 6: 
Again, apologies for the state of the packaging but this is another trusty favourite. It's the stay perfect foundation in Cool Ivory. I first used this for my wedding and I really liked the coverage. It's not too heavy but is nice and even and I think my skin looked pretty darn flawless (even if I do say so myself!) I think it's best used with a foundation brush and when I'm not using the Dior Airflash, I'm using this! 

Number 7: 
Bit of a boring product, that doesn't look great in the photo. It's the Stay Perfect Smoothing and Brightening eye base. I use this most days and I do think it helps my eye shadow to last. I have also used it on its own with a bit of mascara when I can't be bothered with eye make up and I think it looks really fresh. It also helps to smooth out any bumpy bits. Just a good, strong product. 

Number 8: Nearly there!
These are the Stay Perfect eyeshadows in Beach Shine and Wheatsheaf. These are really nice eyeshadows that work well together and last the day. They also have a nice shimmer to them. They create a really nice, natural daytime look. 

Number 9: 
This is the Sheer Temptation lipstick in Romantic. Another wedding day favourite  of mine. These lipsticks are really glossy and I love this colour. It just gives a nice sheer, dewy feel to the lips that also feels very moisturising. It's a bit of a cross between a lipstick and a gloss.

Number 10: we made it! 
Finally, (and this is definitely a last but not least thing) are the BB lips Beauty balms. As you can see I'm a big fan. My favourite is the peach on the left, which the name has rubbed off from... These balms leave my lips feeling really moisturised but also leave a lovely colour. The peach is the most subtle and I use it pretty much everyday. They also have a nice shine to them but aren't as sticky as lip glosses. I really like these and I will keep buying these as you get the colour of a lipstick, the finish of a gloss and the nourishment of a lip balm. Amazing stuff! 

And there ends the very long post! I have many other No7 products that I could have included but I would have been typing for the rest of the month! I hope this post is of some help and if there are any other amazing No7 products I've missed, please let me know.

Thanks for reading
Becky xx

On the hunt for a cheaper face cream...

Hello everyone! This is the first of 2 new blog posts that I am writing today and it is going to be about a new face cream that I'm trying.
I know I blogged about the Clarins moisturisers not long ago but I'm nearly out of night cream (very sad times). So, I did a bit of research to see if I could find something that was going to be a bit easier on the bank account. Ideally I wanted a cream that I could use for both day and night. I had been having a look at some of the Origins products online and yesterday went to their concession in House of Fraser, Birmingham. 

Origins have a range of different lotions and potions all at different prices. I picked up one of the cheapest moisturisers, which is the GinZing energy boosting moisturiser for £23.
It says that you can use this day and night and claims to brighten and energise the skin. I tried it last night and it smells great and made my skin feel nice and smooth. It isn't as rich as the Clarins moisturisers but I think that might be a good thing as, although I love it, I was starting to get some breakouts. So far so good! 
I did also get a freebie with my cream (yey!) It is the Clear Improvement Active charcoal mask to clear pores. You get 4 little pods of product (1 per use) which I think is a decent sized freebie! I haven't tried it yet but it is their best selling mask apparently. 
I will keep you updated on how I get on! 
Thanks for reading.
Becky xx

Sunday, 1 June 2014

Happy Blog Readers!

Ok so they are my sister and my friend but they're picking up products that were recommended by me on my blog! Eek! 


Thanks ladies! 
Xx